:no_upscale()/cdn.vox-cdn.com/uploads/chorus_image/image/70765625/ai_bias_board_1.0.jpg "Pull faces. How to train AI on your face to take silly portraits?")
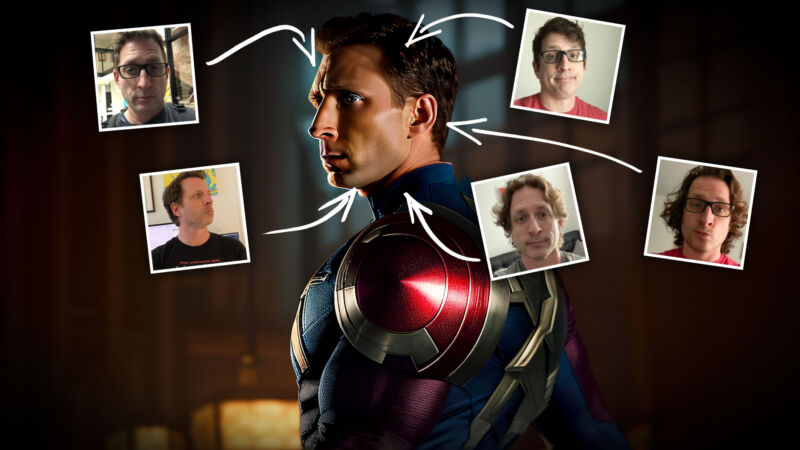
By now you've read a lot about generative AI technologies like Midjourney and Stable Diffusion, which convert text input into images in seconds. If you're anything like me, you'll immediately think of how you could use this technology to punch the Mona Lisa or Captain America in the face. Who doesn't want to be America's butt?

I have a long history of sticking my face in things. This used to be a tedious process of finding or taking a photo with the right angle and expression and then using Photoshop to blend my face into the original. While the result is crazy in my opinion, it's worth it, the process takes a lot of time. But with Stable Diffusion and Dreambooth, I can now train models on my face and then layer them to my heart's content.
In this guide, you'll learn how to install Stable Diffusion on your computer, train DreamBuzz on your face, and create so many selfies that your friends and family will finally stop laughing. The whole process takes about two hours from start to finish, most of which time is spent working on your drawings in Google Collab Notebook.
Before we begin, a few notes.
system details
For this study I am using a Windows PC with Nvidia 3080Ti 12 GB VRAM. You must have an Nvidia graphics card with at least 4GB of video RAM to run Stable Diffusion. The stable distro runs on Linux systems, Macs with M1 or M2 chips and AMD GPUs and can build images using only the CPU. However, the method requires some adjustments, so Windows computers with Nvidia GPUs are selected for the purpose of this study.
Ethical issues
When it comes to generative imaging software like Stable Diffusion, there are ethical issues that I feel I have to acknowledge. There are legitimate questions about how the data used to train stable diffusion was collected, and whether it is ethical to train programs on artists' work without their consent. This is a large subject that is beyond the scope of this investigation. I personally use Steady Diffusion as an author to help me create quick character sketches and it has become an invaluable part of my process. But I don't think the works created by Stable Diffusion should be marketed until we have at least resolved the ethical dilemma and how exploited artists can be compensated. And for now, I'm of the opinion that the stable distribution should remain for personal use only.After all, technologies like Stable Diffusion are both exciting and terrifying. It's fun because it gives people like me, who reached the pinnacle of art in kindergarten, the opportunity to create the paintings I dream of. But it's scary because it allows you to create very realistic propaganda and fake jobs that can ruin people's lives. So you need to train Steady Diffusion on photos of yourself or someone you approve. Epoch.
Who wants that now?
Install and use a stable distribution
There are several programs that you can use to run Stable Diffusion locally. For this study, I chose Simple Diffusion (formerly Stable Diffusion UI) because it's easy to install and has an automatic update feature, so you'll always have the latest version. There are other installers that offer a different, more customizable experience, like InvokeAI or Automatic1111, but Simple Distribution is user-friendly and easy to install, making it a good place to start.
- Go here and click Download. (These instructions can also be found in the following text.)
- On the download page, click the Download for Windows link.
- You will find a ZIP file named "stable-diffusion-ui-windows".
- Right click and extract the file.
- You should now have a directory called "stable-diffusion-ui-windows". Go to this folder and find a subfolder called "stable-diffusion-ui". Move this folder to the root level of your hard drive.
- Locate the Start Stable Diffusion UI command script file and double-click it.
- Agree when it comes up.
- A Windows command window will open and the installation process will begin.
To download the installer, go here and click Download which will take you to the download page. Then click the Download for Windows link. This will download a ZIP file named "stable-diffusion-ui-windows".
Right click on the file and extract the files. You should now have a directory called "stable-diffusion-ui-windows". Go to this folder and find a subfolder called "stable-diffusion-ui". Move this folder to the root level of your hard drive.
Ideally you should install it in C. at the root level of the driver. Note, however, that creating images can take up a lot of disk space. So if space is limited, you can install them on a secondary drive as long as it is at the root level.
After moving the directory, go in and locate the command script file called "Start Stable Diffusion UI". double click. A security warning appears stating that the program is from an unknown publisher. Of course, you have to be careful about what you download and install on your computer. I've had a basic transfer for a while with no problems. When you're done, check the box and click Run.
At this point, the Windows command window will open and the installation process will begin. This is a good time to make a sandwich or go to the bathroom as the installation can take 10-30 minutes depending on the speed of your internet connection. The beauty of the ease of distribution and the fact that it takes so little time to install is that it downloads everything you need, including the model you will use to create the image. Simple Distribution comes preinstalled with Statable AI model version 1.4. There are many models available - some official stable AI models and many custom models created by the Stable Diffusion community - and I encourage you to try them out when you get more comfortable with the software. For this step, the 1.4 model is sufficient.
If you decide to browse and download a different model, be aware that there are two types of files: Checkpoint (.ckpt, also called Pickle format) and Shield. Most of the Stable Diffusion community has switched to using secure tools as it is a more secure file format. When making your selection, always choose protective gear over pickups and be sure to scan everything you download.
I hope your sandwiches were tasty, so it's time to move on.
When the installation is complete, you will see "Loaded stable-diffusion model from "C:\stable-diffusion-ui\models\stable-diffusion\sd-v1-4.ckpt to device" as the last line in the command line: cuda: 0" and the browser window to the home page of Easy The Diffusion will open.
- When the installation is complete, the last line of the command line window is "Loaded stable diffusion model from "C:\stable-diffusion-ui\models\stable-diffusion\sd-v1-4.ckpt to device. Darling: 0"
- A browser window will open with the Simple Spread home page.
Don't close the command prompt window. Just minimize and forget. Opens when you use Steady Diffusion. You don't have to interact with it other than close it when you're done. Now is a good time to mention that you should return to the C:\stable-diffusion-ui folder and not link the Start Stable Diffusion UI.cmd file to your desktop. Every time you want to start the program, you have to go to the directory.
Use the simple distribution
You have installed Stable Diffusion. Well done. So what's the point of all this? Most people want to get to the part where you put your face on something, so I won't spend too much time on the UI, but that's the point.
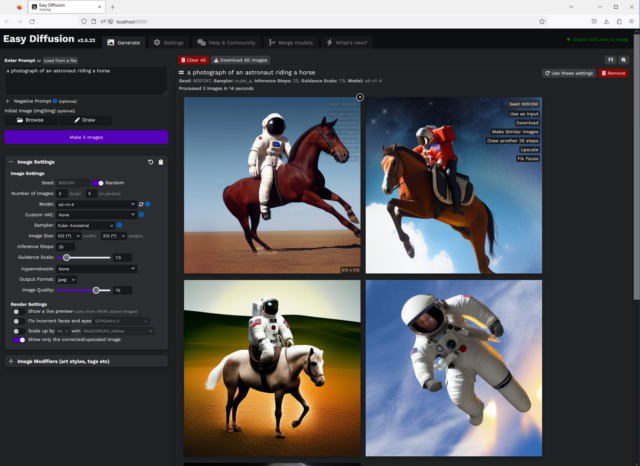
The clue is text that turns into an image. For example an oil painting of a cat holding a balloon.
At the negative prompt, enter the things you want to exclude .
- Record results for "Balloon oiling with cat".
- Here we remove the orange bubbles with negative signs.
Below, in the image settings panel, we have seed . Now leave it to chance.
The number of images (total) is exactly what it looks like. The number of images is the number of images in parallel. So if you want to create five images, you can create five totals in a batch or five totals in five total, which is much faster. What you can create affects the amount of VRAM on your GPU as well as the frame size, which I'll discuss later. I suggest experimenting to find the best combination that works for your system.
The model is the checkpoint file or security backup I discussed earlier. If you have multiple models (which we cover in the Dreambooth tutorial), you can use this drop-down menu to choose which model to use.
Custom UAE . It is a dynamic autoencoder representing United Arab Emirates. In the context of a stable distribution, this helps correct some of the model's errors. A custom UAE included in the basic distribution, vae-ft-mse-840000-ema-pruned, fixes some human eye and manual modeling issues. Different models may have specific UAEs, but I rarely use anything other than what's included.
Example: This is basically a math formula that converts noise into an image, and since I'm just finishing high school algebra I can't go much further. What I do know is that different samples give you different pictures, even from the same breed. The three Euler exponents I use the most are DDIM and DPM++ SDE. Each has its own pros and cons and I recommend deciding which one you like best. I prefer DDIM because it quickly produces consistent results in a few small steps.
The Image Size drop-down menu controls the resulting image size. The larger the image, the more VRAM you need. You might want to stick with 512 x 512 for now. Not only does it overwhelm your GPU, but the robust diffusion models you can use are trained on a dataset consisting of 512x512 pixel images so you get the best results. Stick to these standards.
Initial steps are the number of passes the program makes when attempting to convert the sound to an image. Conventional wisdom often tells us that better is better, but that wasn't always the case here. Eventually going up is a waste of time. This is another area where testing is important. As I mentioned before, I prefer DDM as a sampler because I can usually create a good image in 15-20 steps.
Below that is a directional bar that tells you how much attention your tip should pay to a fixed spread. Lower values give more room for interpretation; Higher prices make it tighter. Again, higher tiers aren't always better. I find that a value between 6 and 9 is best for good leadership.
Hypernetworking is a specific topic that is beyond the scope of this research.
The output format is self-explanatory. The default is JPG because PNG looks better but has nothing to lose and can take up a lot of space.
The display settings are largely self-explanatory. I like to eliminate "correct fake face and eyes" because face correction often results in what people look like with an airbrush.
I also disabled scaling when scaling each image, and the Easy Diffusion UI conveniently adds an upscale button to each image so you can zoom in if you find one you like.
The image modifier is a key to creating tooltips. I won't go into that, but feel free to try. Having said that, I have to say that I don't agree with imitating the style of any living artist. There are many dead artists that can be copied without giving the living artist's name, and many ways to find a unique style.
Dreambooth Training
Now we come to the fun part. It's time to train a model that will allow us to attach our faces to things. There are several possibilities for this. I'm going to introduce you to the Dreambooth method because I find it gives the best results, although it takes a little effort. For this we use Google Collab Notebook.
photo selection
But first we need to choose a photo to use. You can train the model on your face with six to six images, and I've done training that used 100+ images, but I've had the best results with 20-30 images. You want to choose close-up shots that have no one in the frame and a lively background. Ideally, you'll take a few vertical shots, a few side shots, and a few three-quarter shots. Try to avoid taking selfies as the view will distort the size of your face.
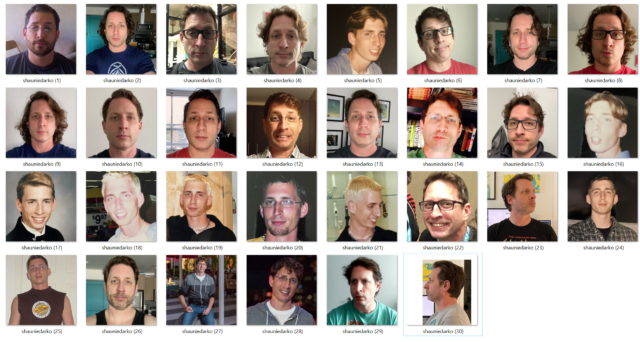
You should avoid photos of you in the same place or in the same clothes. If you have a clock behind you in an image, Dreambooth will adjust the clock to your face and try to create a stable distribution in every image you create. The same goes for glasses or facial hair. For my training to make the models more dynamic, I chose photos with different hairstyles, faces and ages. You don't have to include the photo below the shoulder, but you can if you want.
Once you've selected your photos, you'll need to crop and resize them so they're all 512 x 512 pixels. Try to use PNG file format to avoid JPG artifacts. If you don't crop it, the program will do it for you and your face may not center properly. Before you do so, think about the word you will use when you want the model to grimace - angry or loud. For example, I use shauniedarko because it's easy to remember, it's my twitter account, and there are no words in the training dataset. If you use any kata in a training set you will not get good results.
So you have your trigger word and photo. Rename each file using the pattern "triggerword (x).png" where x is a number.
Embrace the facial expression
You will also need the Hugging Face spell from the Stable Distribution Models repository. To do this, visit huggingface.co and create an account. Then go to Settings, then Access Token and create a new token. Name it anything you like and change its role to Writing. Copy and paste the token into a plain text file named "token.txt". Then go to this link, accept the terms and conditions and you're good to go.
- After creating your Hug Face account, go to Settings.
- Go to Access Tokens.
- Create a new token and give it whatever name you want. Change the role to "write" and copy and paste the token into a plain text file named "token.txt". Then open this link.
Training
- Here is the Google Collab we used.
- Play the first episode by pressing the play button.
- You will get a popup saying the notebook was written by Github and not Google. Click Continue Running.
- You will be asked for your permission to connect your Google Drive. This is the norm. This allows the laptop to store and access important files.
- Then click the Play button next to Dependencies. This will install all the necessary files to run the laptop. Once done, you'll see a green tick next to it.
Now we can start training. You need a Google account to do this. Each Google account comes with 15GB of free storage. You need 6 to 8 GB free before you start.
Here is the Google Collab we used. Click this link and let's get started! Make sure you're signed in to Google.
Play the first episode by pressing the play button. You will get a popup saying the notebook was written by Github and not Google. Click Continue Running. You will be asked for your permission to connect your Google Drive. This is the norm. It allows the notebook to store and access important files.
Next, click the "Dependencies" button on the play button. The button installs all files that you can run.
Before you can finish the next part, you need to open your Google Drive. » When finished, click the play button, it will become "Done".
- In the section «Стожцел/Бернель сесия»:
- Words:
- Pre-select the 30 images we uploaded earlier, each of which takes a minute to download.
- When your images are uploaded we will animate them: you can leave the captions on.
- Education???
- Go to "Text_encoder_training_steps" and change it to 1050::
- Click the play button and wait: 30 frames will be displayed
- The tutorial is complete when you see this screen:
- Go to Google Drive - fast-dreamboot > Sessions > unesnam and locate the ckpt file provided earlier.
- Move the file to the computer folder C:\stable-diffusion\Models\stabledifusion: Then open Simple Diffusion and start it
In the section «Стожцел/Бернель сесия»:
Click on the sample images, click the button, button, button, button, button, button, button, button, button, button, button, button, button, button, button, button, button, button, button, button, button, button, button, button, button, button, button, button , by clicking the button, the button, the button, the button, the button, the button, the button. Button, the button, button, button, button, button, button, button, button, button The best way is to know you're still breathing.
When your pictures are uploaded, we move, move, move, move.
And the training does not repeat face, face, face, face, face, steps, steps, steps, it is not enough to reproduce your different styles.
Enter the number of steps after "Text_encoder_training_steps" and change it to 1050: Number of numbers Number of numbers Number of numbers Number Number Number Number Number Number Number Number Number Number Number Number Number Number Number Number Number Number Number Number Number Number Number Number Number Number Number Number Number Number Number Number Number Number Number Number Number Number Number Number Number Number Number Number Number Number Number Number Number Number Number Number Number Number Number Number Number Number Number Number Number Number Number Number Number Number Number Number Number Number Number Number Number Number Number Number Number Number Number Number Number Number Number Number Number Number Number Number Number Number Number Number Number Number Number Number Number Number Number Number Number Number Number Number Number Number Number Number Number Number Number Number Number Number Number Number he number number number number number number number number number number number number number number number number number number number number number number number number number number number number number number number number number number number number number number you can start it.
However, note that each deal is approximately 100%.
After that, click the play button and wait.
30 pics and should last 30-50 minutes depending on how you are feeling. Again, make sure you don't freak out and scroll around google - because of unemployment:
ሲጨርሱ ወደ ጎግል ይሂዱ- ነፃ ፈጣን-ድራም> ክፍለ> Uesname እና እና ፋይል ቀደም ብለው ፋይሉን ወደ ወደ ያንቀሳቅሱት C: \ Stable diffusion \ Model \ Stables ቀላል- ስርጭት-
ዱቄቱን በማዘጋጀት ላይ
አዲስ ሞዴልን ውስጥ ውስጥ እንደሚቻል ቀደም ሲል-በዚህ መንገድ, አዲስ አዲስ ሞዴልን. የቁም ሥዕሎች የቁም ሥዕሎች የቁም ሥዕሎች የቁም ሥዕሎች 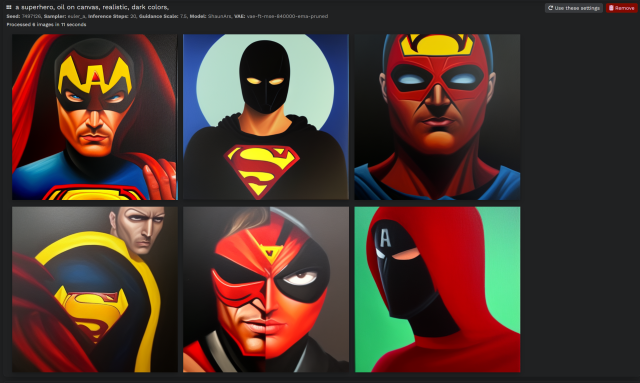
ቆይ ግን። ሀሀሀሀሀሀሀሀሀሀሀሀሀሀሀሀሀሀሀሀሀሀሀሀሀሀሀሀሀሀሀሀሀሀሀሀሀሀሀሀሀሀሀሀሀሀሀሀሀሀሀሀሀሀሀሀሀሀ. ስዕሎችዎን ለመጫን የኦፕሬተር ቃል ስለሚያስፈልግዎ።
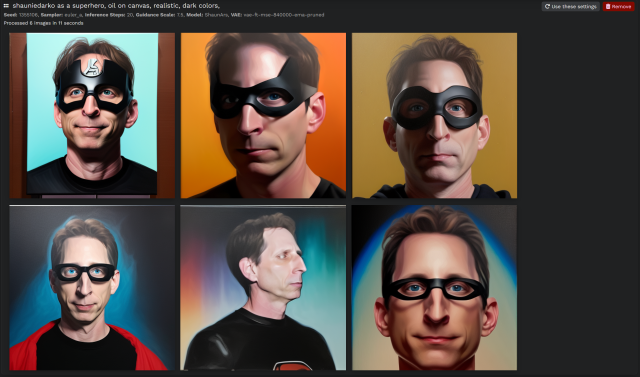
Y шауниедаркон часть ???
እና ፊቴ ይኸውና፡ የተረጋጋ ስርጭትን ለሚከተሉት መጠቀም ይቻላል፡-
የአጠቃቀም መመሪያ:
- እነሆ እኔ እንደ እንግሊዝ ንግስት ነኝ። በዚህ ጉዳይ ላይ እኔ እኔ ኢጋካን ኢጋካን ኢጋካን ኢጋካን ኢጋካን ቻንዱም ቻንዶምን በ ፣ ነበር ነበር ነበር ነበር ፣ what what what what what what what.
- እነሆ እኔ ዞምቢ ነኝ። እ.ኤ.አ. ሳርሳፔሊ
- ाीी उउ्थथकक्र डड्रो मोमोयया ैगेमोया मोमोयया मोमोयया अधअवयाा अधमोया आवअगीगोव आवअगीगोव मोमोमोंगोवंगोव मो्रीीी मो्रीीी मो्रीीी आवअगीगोवीगोवा मोमोमोिोंों आवमोमोिोंंगोव
- ማስታወቂያዎች፡-
- እና፣ በእርግጥ፣ አሜሪካ መሆን እፈልጋለሁ አልኩ፡-
Եվ այն այն ամենն է է է համար համար համար համար սովորելը, սովորելը, թե հուշում հուշում հուշում հուշում հուշում արդյունքները արդյունքները արդյունքները արդյունքները արդյունքները ժամանակ պահանջել պահանջել ՝ ՝ տեսնելու է է է աշխատում աշխատում աշխատում աշխատում աշխատում աշխատում աշխատում աշխատում աշխատում աշխատում աշխատում
Զվարճանալ!
.png "Admin")