Trying to figure out how to get the most out of a new product can be overwhelming. Luckily, many companies offer product tutorials so you can get the most out of your purchase. In this article, we'll talk about the benefits of product tutorials and how they can help unlock the full potential of your product.
type of product
Depending on the product you are purchasing, different types of product manuals are available. Some of the most common product guides include:
Video lessons. Video tutorials are a great way to see the product in action and learn how to use it step by step.
Documentation. Many products come with documentation that provides detailed instructions on how to use the product.
Online courses. Many companies offer online courses that provide more interactive learning.
Product Support Institute
There are many benefits to using product manuals to teach you how to use your products. Some of the main benefits:
Better understanding of how to use the product.
Increases confidence in using the product.
An opportunity to discover new features and capabilities of the product.
Ability to solve problems independently.
The ability to save time and money by eliminating the need for external assistance or additional training.
Where can I find production lessons?
Product tutorials are available from different sources depending on the product you purchased. Some of the more common sources are:
Manufacturer's website. Many manufacturers post product manuals on their websites.
YouTube: There are many product guides available on YouTube, often published by the manufacturer or other users.
Online forums. Online forums can be a good source of information and guides for specific products.
Diploma
Product tutorials are a valuable resource for anyone looking to get the most out of their product. With many guides, you can study at your own pace and on your own schedule. Whether you prefer video tutorials, documentation, or online tutorials, we have a tutorial to help you unlock the full potential of your product. So why not start learning today and take your product experience to the next level?
Technology is constantly evolving and it can be difficult to keep up with the latest trends and developments. Fortunately, there are plenty of technical tutorials online to help keep you up to date with the latest technology. In this article, we will provide a complete guide to technical tutorials and how they can help you master your technical skills.
Types of technology lessons.
There are many types of technical tutorials available online. Some of the more common types include:
Video Tutorials – Video tutorials are a great way to learn technology skills because they provide a visual demonstration of how to complete a task or use a tool.
Text-Based Lessons: Text-based lessons are a classic way to teach technology skills. They tend to be more detailed than video lessons and are easier to follow at your own pace.
Interactive Tutorials – Interactive tutorials allow you to practice your technology skills in a simulated environment. This can be a good way to get hands-on experience without the risk of breaking hardware or software.
Advantages of technology classes.
There are many benefits to using technology lessons to improve your skills. Some of the main benefits include:
Expand knowledge and understanding of technology and software tools.
Increase confidence in the use of technology and software.
Access to a variety of resources and expertise.
The ability to learn at your own pace and according to your own schedule.
The ability to save time and money by avoiding the need for formal training or hiring outside consultants.
Where to find technical textbooks
There are many places to find technical tutorials online. Some of the best sources include:
YouTube – YouTube is a great source of educational videos on a variety of tech topics.
Online Learning Platforms – Platforms like Udemy, Coursera, and Skillshare offer a variety of educational courses and programs.
Tech blogs and sites: Many tech blogs and sites offer tutorials and guides on specific tech topics.
Closure
Technical tutorials are a valuable resource for anyone looking to improve their technical skills. With so many online tutorials available, you can study at your own pace and schedule. Whether you prefer educational videos, text-based tutorials, or interactive tutorials, there are tutorials to help you master your tech skills. So why not start your research today and take your technical skills to the next level.
Laptops used to be a compromise - you wanted to trade processing power for ease of portability.
As technology improves, laptop speeds will eventually surpass (and sometimes surpass) desktops, and for almost all users, there is no advantage to choosing a desktop over a laptop.
Subject: Apple's new MacBook Pro with M2 processor.
When Apple started making its processors, it became clear that they were very fast.
I tested a 16-inch Apple MacBook Pro with an M2 Pro processor, and it's the fastest Mac—laptop or desktop—I've ever come across.
design
Apple has launched the 14-inch and 16-inch MacBook Pro in late 2021. They are equipped with M1 chip.
People also read...
Compared to Apple's latest laptop models, the 14-inch and 16-inch MacBook Pros looked a little different.
They are slightly thicker and don't stick around the edges like previous models Their curtains extend almost to the edge of the cabinet.
The keyboard is black and the underside of the keys is also black, making it easy to distinguish it from other models.
The 2023 14-inch and 16-inch MacBook Pro M2 models share the same design as their predecessors.
characteristics
The MacBook Pro M2 comes in two processor variants: M2 Pro and M2 Max.
I tested the M2 Pro with 32 GB of RAM and a two-terabyte solid-state drive.
The M2 Pro has 12 processing cores – eight performance cores and four efficiency cores.
The M2 Pro's GPU has 19 cores that power the 16.2-inch Liquid Retina XDR display with a resolution of 3456 x 2234 pixels.
The display features a 1,000,000:1 contrast ratio with Promotion technology for an adaptive refresh rate of up to 120 Hertz. It is lit by 10,000 mini-LEDs and can display up to one billion colors.
The minimum RAM configuration is 16 GB, but M2 Pro models can be upgraded to 32 or 64 GB. The M2 Max can be upgraded to 96GB of RAM.
Internal storage is all solid state with configurations ranging from 512GB to 8TB.
The battery has a capacity of 100 watt hours and it can surf the internet for up to 15 hours per charge.
Unlike Apple's previous MacBook Pro, which only had a USB-C Thunderbolt port, the 14-inch and 16-inch models have several extras, including HDMI, an SD card reader, a Magsage charging port, a headphone jack, and three Thunderbolt 4 ports. There are ports. port.. port (up to 40 Gb/s).
M2 Pro models can run two external displays with 6K resolution or one 8K display.
M2 Max models can support four external displays (three 6K and one 4K) or three displays (two 6K and one 8K).
The backlit keyboard has Touch ID and an ambient light sensor. The Force Touch trackpad is the largest I've seen on a laptop.
Network options include Wi-Fi 6E and Bluetooth 5.3.
The 1080p FaceTime camera sits behind the notch at the top of the display.
The 16-inch MacBook Pro comes with a USB-C to MagSafe adapter with a 140-watt power supply. You can turn on and charge the laptop via one of the USB-C Thunderbolt ports.
Believe it or not, this laptop has a six-speaker audio system with a force-cancelling subwoofer, and it sounds great.
Why so similar?
So why does the M2 look so much like last year's M1? Good question.
Last year, the 14-inch and 16-inch MacBook Pros got a pretty big redesign, and everyone I know thought they were really good. The addition of more ports, the MagSafe connector and the addition of the M1 chip were almost universally welcomed.
A year later, Apple's M2 processor offered a 20-30% increase in speed and graphics over the M1 version.
the price
The 14-inch MacBook Pro starts at $1,999 for the M2 Pro model with 10-core CPU and 16-core GPU, 16GB of RAM and 512GB SSD.
The 16-inch model starts at $2,499 for the M2 Pro, which features a 12-core CPU and 19-core GPU with 16GB of RAM and a 512GB SSD.
In case you're wondering, the most you can spend on a 16-inch M2 Max with a 12-core CPU, 38-core GPU, 96GB of RAM and an 8TB SSD is $6,499.
For whom?
The MacBook Pro M2 is the fastest Mac released by Apple. The same cannot be said for last year's M1 version.
In fact, if you have a 14-inch or 16-inch MacBook Pro M1, you don't need to upgrade just for a 20-30% speed increase, unless you're in a job like video editing where you stress the M1. . . processor
I love the MacBook Pro M2, but as a 14-inch M1 owner, I'll stick with it for now and see what happens next.
The M2 is a great upgrade for anyone with a MacBook Pro ready for an Intel-powered upgrade.
I compare the MacBook Pro to the latest iPhones - now that Apple has chosen the design, it's nice to see annual speed updates and other new technologies included.
Jim Rossman is a technology columnist for Tribune News Service. He can be reached at jrossmantechadviser@gmail.com.
Get the latest local business news delivered to your inbox every week for free.
Danger Ahead - Speed Bumps on the Decarbonization Road Part 2
The INSE P20 Pro Dog Grooming Kit is designed to keep your pet groomed and clean without the need for expensive trips to a professional groomer. Along with various grooming brushes and cleaning tools, it includes a handy trimmer tool that easily connects to a lightweight yet powerful vacuum.
Whether your pet has short or long hair, grooming can be messy. Fluff and fur are everywhere, especially if you want to comb your feline friend or canine friend during the winter months or on rainy days. Pet hair and dander can easily come off with your regular brush or scissors, and carpets can be difficult to dust. If a member of your family suffers from allergies, this can also be harmful. Make sure you have one of the best vacuum cleaners for your home to pick up all pet waste.
INSE has developed a smart device that allows you to take care of the most suspicious dogs and cats, the INSE P20 Pro Dog Grooming Kit. With five care and cleaning tools attached to the vacuum, all you have to do is pick up accessories and get ready without worrying about stray hairs or dander.
With a spacious container, an extra filter, three cleaning modes, and a set of pet grooming accessories, INSE says its pet grooming kit is easy to use, even for beginners. Is it enough to be on our list of the best pet hair vacuums?
We tried the INSE P20 Pro Dog Grooming Kit at home on our longhaired Golden Retriever Hopper and our longhaired Tortoise Gracie. We also used two cleaners for their regular bed, their favorite sofa, and our rug. Read on to find out how the INSE P20 Pro Grooming Kit differs from a regular fine brush, how loud it is, and how our furry little ones liked or didn't like the vacuum cleaner.
INSE P20 Pro Dog Grooming Kit
The INSE P20 Pro Dog Grooming Kit is beautifully designed and small enough to store in a closet, garage, or even under your bed. The vacuum block itself measures approximately 9 inches wide by 9 inches high. At the base is the motor, encased in white plastic, an attractive grooved base and a large power/mode button. The notch isn't just for looks, you can wrap a flexible hose around it when not in use.
At the top of the device is a 0.3 liter clear plastic container where you can see how much hair and pet hair you are collecting as a groomer. In the middle of the tank is a stainless steel strainer, the first part of the double filtration process included in the installation.
All you have to do is press the quick release button on the back of the unit to empty the bin. The Trash is emptied, so you can move it to the Trash and empty it. At the bottom of the bowl is another mesh and plastic HEPA filter designed to trap fine particles and allergens.
The clear plastic hose extends up to 4 feet (52 inches) so it's long enough to handle even the largest dog breeds without having to carry the vacuum around with your dog. This can help if you have a pet that isn't interested in the sound of a vacuum cleaner running. The power cord is also about 13.5 feet long, giving you plenty of flexibility and access to an outlet.
Each nozzle fits securely on the pipe with adequate compression. The nozzles themselves are made in white, gray and green. The entire unit can be lifted with the reversible handle, so you can easily move it around while caring for your pet. It holds up well when not used a lot. The hose can be quickly disconnected by pressing a button.
Both the removal brush and the thinning brush have a gray lever that separates the hairs from the bristles or comb teeth so that they can be sucked into a hose and vacuumed out. Overall, the INSE P20 Pro dog grooming kit seems well thought out, powerful and very comfortable to use.
INSE P20 Pro Dog Grooming Kit. Features and Accessories
The INSE P20 Pro Dog Grooming Kit comes with five attachments;
• Thinner brush. This wire-bristled brush gently massages your pet as you groom, helping to remove excess oil and untangle tangles. It's also designed to penetrate thick, heavy underwear, which is great for our Golden Retrievers.
• Discard the brush. Designed to reduce and stabilize hair loss, this metal toothed comb keeps your pet cool and fresh in the summer by preventing bacterial growth and excess oil that can clog hair follicles.
• Tools for cutting hair. it comes with four removable plastic visor combs for adjustable styling.
• Hacking tool. It is designed to collect pet hair from beds, under sofas and in crevices, as well as other places.
• Cleaning brush. has bristles and bristles to grab and clean pet hair from couches, cages, beds and carpets. According to INSE, it can also be used as a foot cleaner to remove dust after walking.
The INSE P20 Pro Dog Grooming Kit comes with an extra filter, trimmer cover, flexible hose, 5 clipper guard combs (0.125", 0.25", 0.5", 0.75" and 1") and an instruction manual.
There are three cleaning methods you can choose from:
• Eco mode: 5000 Pa for cats or small dogs such as Chihuahua and Shih Tzu.
• Standard mode: 7000 Pa suction power for medium-sized dogs such as Australian Shepherds and Border Collies.
• Maximum mode. 9000 Pa suction power for the thick skin of long-haired breeds like Samoyeds, Golden Retrievers and Huskies.
The large tray is especially convenient for furry pet owners or anyone who wants to clean their fur, trim their fur and clean their bedding.
INSE P20 Pro Dog Grooming Kit. Setup and assembly
The INSE P20 Pro Dog Grooming Kit comes in a fully recyclable cardboard box. Each accessory, device and hose is securely packaged and protected by a recyclable plastic cap. The Quick Guide provides instructions on how to use the equipment, how to use each accessory, and how to clean and maintain the equipment. There is also a quick troubleshooting guide and a one-year warranty section.
The device is easy to install and can be operated by one person. All that's left to do is attach the cartridge to the engine block, push in the extension pipe, and select the finishing tool.
Selecting the cleaning mode is also simple. the unit starts in the lowest economy mode of 5000 Pa. By pressing the "Mode" button, the cleaning mode changes to "Standard", and by pressing again - to "Maximum". The light around the button illuminates in segments so you can see at a glance what mode you're in.
The manual has useful information on how to use most of the attachments (although the trimmer information is a bit simplified for beginners) and how to make sure the brush hairs are sucked up in the vacuum cleaner. You have to press the gray buttons on the back of the flimsy tool and the anti-shade brush to make the vacuum suck up the hairs and remove them quickly and cleanly. The turn signals do this automatically.
If you're new to sculpting like us, you'll probably find the instructions pretty straightforward. We had to watch a few YouTube videos before we were confident enough to clip our golden retriever, and even then we weren't sure exactly what we were doing. You have to choose one of the five protective combs, attach it to the machine and select the brushing mode. The manual recommends settings for each accessory and warns against using Max mode with a turn signal, so it's worth double-checking.
INSE P20 Pro Dog Grooming Kit. Performance:
We first tested the INSE P20 Pro Dog Grooming Kit at home on our Golden Retriever Hopper. After testing other pet grooming vacuums in the past, we've found that Hopper likes to brush himself with the vacuum and then bypass the device to suck up pet hair.
Not so with the INSE P20 Pro Dog Grooming Kit. Hopper really drove straight to this instrument. He particularly liked the Slicker Brush tool, which removes fine hair and pet dander. We were able to leave the vacuum on and even managed to turn it on at the highest setting, the highest and most powerful setting. After a while, it was easy for either of us to calm him down, without an extra hand to calm him down.
However, our long-haired cat Gracie did not share her canine friend's newfound confidence. Although he liked being brushed with a finer nozzle, the moment we turned on the vacuum he disappeared from the room in a flash, despite being fifteen and a half years old. So if you have a cat that doesn't like vacuum cleaners, they are unlikely to use this gadget much.
Next was the shadow tool. It was perfect for getting into Hopper's thick, heavy underwear; we could really feel it working through its thick coat and pulling out all the hair that usually ends up in our house. We found this brush removed most hair from her coat, although I think it was too harsh for our sweet little cat Gracie.
When it came to cutting the runner, we were very careful. The most basic instructions in the manual indicate that the most knowledgeable dog owner will be warned. However, we were able to trim the extra down around his bottom and tail, as well as part of his belly, which we were very happy with. We cut our hair because the vacuum picked up pet hair very well.
We were less than impressed with the furniture cleaning tools. I think the suction of a vacuum cleaner, powerful enough to suck pet hair from brushes, doesn't seem powerful enough to reliably remove pet hair from furniture. It's not terrible, but not as good as our Dyson V12 Detect Slim review. So, for now, we'll use a regular vacuum to remove pet hair and dander from sofas, chairs, and rugs.
There are lots of great tips on the internet to help your pet get used to the noise and the feeling of being empty. For example, you can brush your pet without vacuuming, you can walk it for a while in the same room before approaching a crawling or fluffy toddler, or you can try to reward your pet with care during or after the grooming process.
While INSE claims the P20 operates at 60 decibels or less, we found it to be much higher. Using a decibel monitoring app, we found it to be over 60 decibels in economy mode, over 70 decibels in standard mode, and around 90 decibels in maximum mode. It's noisier than most vacuums, so if you have pets that are wary of loud noises, this might not be the tool for you.
Overall, however, we were very happy with how the INSE tool performed on pet hair, how well our dog licked it, and how little hair we picked up with our regular vacuum.
INSE P20 Pro Dog Grooming Kit. care and maintenance
The INSE P20 Pro Dog Grooming Kit is small enough to store in a closet. the hose can be wrapped around the base of the unit and the power cord can be rolled up and stored under the unit.
Both brushes are self-cleaning, so there is no need to clean the brushes after each use unless they are dirty.
You probably want to empty the trash can instead of leaving old pet hair in there. To clean the stainless steel container or filter, you can wash it in warm soapy water or wipe it with a damp cloth. just make sure both are completely dry before reattaching them.
The HEPA filter is also designed to be removed and cleaned. Just tap it on the dustbin to shake off dust and debris, or clean it with a soft brush without rinsing it with water. A replacement filter is supplied with the device. We couldn't find any information in the manual or the INSE website on when to replace the filter, but as a general rule, the HEPA filter should be replaced every 6-12 months.
The INSE P20 Pro Dog Grooming Kit comes with a 1 year warranty on the device and accessories. There are currently no additional items available for purchase on the INSE website.
INSE P20 Pro Dog Grooming Kit. price and availability
The INSE P20 Pro Dog Grooming Kit is available for purchase on the INSE website and on Amazon. It's quite reasonably priced and on par with other pet grooming kits that include a few attachments and a suction cup.
There are cheap pet grooming tools available online that can do the same job as the INSE P20 Pro Dog Grooming Kit, but many of them don't have a hair suction device underneath. empty. Alternatively, if you already have a vacuum, you can purchase a compatible extension hose and a brush head or clipper for your pet. they are much cheaper and you can buy them for $40 to $70. However, it's not always clear which vacuums they're compatible with, and they don't always come with a one-year warranty.
INSE P20 Pro Dog Grooming Kit. user review
The INSE P20 Pro Dog Grooming Kit has received a very respectable 4.5 out of 5 stars on Amazon, with hundreds of happy customers giving it 5 stars.
Buyers of this grooming tool love being able to groom their pets indoors at any time, many owners of longhaired breeds report that it has been life changing. As one user mentioned, the tool can save you money on regular professional maintenance. “It's more than paid for in a single session because the cost of care has skyrocketed. In my opinion, it's worth it." They also report that it's easy and quiet to use during surgery, and even alert dogs now enjoy grooming.
some reviewers say the vacuum isn't powerful enough to deliver a professional finish, while others say the cleaners aren't good at picking up pet hair from furniture. others say the product could be improved with a bag or case for all the accessories. A few negative reviews point to issues with the clip screen coming off, so it's worth making sure it's secure.
INSE P20 Pro Dog Grooming Kit. What are the experts saying?
We spoke to cleaning expert Karen Barrigan, owner of Housetastic and the cleaning company, to find out what she thinks of the INSE P20 Pro Dog Grooming Kit and who this product might be best for.
“This vacuum is ideal for pets that shed very easily. he has a strong
low-noise suction, it's a lightweight machine that's very easy to use,” explains Barrigan. The vacuum will suck up all pet hair directly into the vacuum box. This means your home will stay cleaner longer because there is less pet hair. .. . இர் மார்கு யாயை அயேர்யார்ஜைநைக்குக்க்திர்ப்பபப்பைநைக்குக்க்திர்ப்பப்குக்க்திர்ப்ப
A pro tip for cleaning the Inse P20 Pro dog kit near the bar. . . “Shake it out a bit in the bin and give it a quick wipe with a damp cloth to remove any hair, dandruff or mites. Then reattach it ready for the next use.”
INSE P20 про дог груминг кит кена хорошо?
Although the initial cost is high, it can save a lot of money. Grooming Grooming Grooming Grooming Grooming .. .. .. .. .. .. .. .. .. .. .. .. .. .. .. .. .. .. .. .. .. .. .. .. .. .. It is easy to use and most animals are said to tolerate the suction function very well. ..
Inse P20 Pro Dog Grooming How It Compares To Competitors
We have recently tested many inexpensive Dyson grooming tools on our dogs and cats. Although the Dyson attachment, which is just an extension hose and slicker brush that attaches to your regular Dyson cordless vacuum, is easy to store, we found our dog loved the grooming kit for INSE P20 Pro dogs, although it is a bit noisy. maybe because our dog associates the vacuum cleaner with taking him out of the house! As a result, one of us can groom our Golden Retriever without getting an extra pair of hands to calm him down. Also, you won't get all the extra accessories with the Dyson tool, such as clippers and a deshading tool.
We also compared the INSE P20 Pro Dog Grooming Kit to other vacuums known to be useful for picking up pet hair around the house.
Bissell CleanView OnePass has powerful suction which makes it invaluable for removing pet hair from carpets. In fact, it's our number one pick for pet hair in our best vacuum cleaners for home buying guide. It comes with a two-year warranty for added peace of mind.
If you are planning to keep more robotic gadgets in the house to save time, you can choose Yeedi vac 2 pro robot vacuum cleaner. It works great for picking up pet hair and debris, and it can also clean up after your pet.
For us, one of the most effective vacuums for removing pet hair is the Dyson V12 Detect Slim. Small and light enough to use on furniture and stairs, strong enough to pick up even muddy footprints on carpets, it's our personal top pick at home. And you will see the result in the trash while you clean.
How to Properly Use a Dog Clipper to Trim Your Dog's Hair
TOKYO - Japanese electronics and technology maker Toshiba has accepted a 2 trillion yen ($15 billion) takeover offer from Japan Industry Partners, an acquisition fund composed of major banks and corporations.
If successful, the offer would be an important step in Toshiba's turnaround efforts, allowing the company to go private and be delisted from the Tokyo Stock Exchange. But outside activist investors have a large stake in Toshiba, and it's not clear whether they'll be happy with the new offering.
The board of directors of Tokyo-based Toshiba Corp. said it accepted the offer at 4,620 yen ($36) after close of trading in Tokyo on Thursday evening. Toshiba closed at 4,213 yen ($32) a share on Thursday and rose 4.2% to 4,390 yen ($34) on Friday.
The move comes amid market turmoil following the massive damage caused by the recent US banking crisis.
The acquisition will maintain Toshiba's Japanese business in collaboration with Japanese partners.
Japan Industrial Partners, founded in 2002 to restructure Japanese companies, lists some of the biggest names it has invested in, including Sony, Hitachi, Olympus and NEC.
According to Japanese media, the consortium includes about 20 Japanese companies, including financial services firm Oryx Corp., electronics maker Rohm Co. and Sumitomo Mitsui Banking Corp.
Serious problems at Toshiba began with a major accounting scandal in 2015, during which the accounting books were falsified for years. This has exacerbated the problems with the nuclear business.
Westinghouse, the US nuclear arm, filed for bankruptcy in 2017 after years of security spending. Toshiba is involved in the decommissioning of the Fukushima nuclear power plant, which was severely affected by the March 2011 earthquake and tsunami.
Toshiba, which has been making home appliances, laptops, batteries and computer chips for years, has gone through several presidents as the brand has come under fire from private equity activists overseas.
The latest proposal is subject to review by regulators in several countries, including the United States, Vietnam, Germany and Morocco. The process is expected to last several months.
Toshiba has been trying to go private in recent years. A proposal to split Toshiba into three and then two companies was rejected by shareholders. The cancellation allows Toshiba to drop activist investors.
Toshiba began modestly as a telegraph equipment factory in 1875. The brand is synonymous with the strength of modern Japanese manufacturing. Although Toshiba remained a shareholder in Kyoxia, the company sold some of its assets, including its flash memory business, now known as Kyoxia.
It is unclear whether Toshiba will be able to resume a strong growth path. Last month, Toshiba cut its fiscal-year profit forecast to 130 billion yen ($1 billion) from a previous forecast of 190 billion yen ($1.5 billion) in March.
In this quick tutorial, Jack Wallen shows you how to use container images to deploy and manage applications on TrueNAS.
You may think of TrueNAS as just a NAS, but it can do so much more.
For example, TrueNAS has built-in container management. So you can easily deploy applications and services with traditional container images in seconds. Additionally, once you add a TrueCharts directory, you can deploy a variety of applications and services. Let's see how it was done.
You need to run TrueNAS, which is as simple as installing a Linux operating system.
After that, log into TrueNAS and click Applications.
In the application window, go to the Directory Management tab and click Add Directory.
In the sidebar that appears, type truecharts for the directory name, and then enter https://github.com/truecharts/catalog for the repository.
Click Save.
This will take another 10 to 20 minutes. After that, go back to the "Applications" tab and click on "Available Applications".
Let's install the Focalboard project management tool. Scroll down until you see the Focalboard menu and click Install.
Scroll down in the sidebar that opens and make sure the application is configured according to your needs. After setting up the app, scroll down and click Save. This will install the app.
Go to the "Available Apps" tab and click the "Open" button. A new tab will open for containerized applications.
And everything you need to work with containers on TrueNAS. There is no limit to what you can do on this platform.
Subscribe to Jack Wallen's How To Make Tech RepublicYouTube channel for the latest tech tips for business professionals .
Razer has a wide range of gaming gear and accessories – now they're also handling Meta Quest 2 VR accessories. The first bracelets and bezels compatible with the Meta Quest 2 have just arrived after being announced at CES in Las Vegas earlier this year. After trying both at home, I'm cautiously becoming a fan (at least the straps).
The company worked with ResMed to design and manufacture the straps, which interested me because Resmed makes the CPAP machine that I use every night. CPAP machines require a head strap to attach the large, yet snug fit, air mask. Similar goals here, but for head-to-head VR headsets.
Razer's straps fit perfectly (at least on my face), but their durability differs from the Quest 2's standard elastic bands. After adjusting the Velcro on the side and top straps, you can drop the headset on your face for an amazing virtual reality baseball experience. hat. At first glance it may seem that the back does not fit, but it fits. Once installed, it feels less finicky and offers enough comfort for intense Beat Saber sessions.
I really wish the straps were a little bigger, but maybe that's just me. Or maybe a padded elastic strap system, like a CPAP strap, will eventually break down and fit my head better.
I also let my 14 year old play it on the Beat Saber. (He got good at virtual reality pretty quickly.) That was great, he told me, but a little odd: He also felt the headphones on his head almost oddly balanced. But once you stop thinking that the helmet might fall off and realize that it won't, it actually becomes incredibly comfortable. But on intense songs on the Beat Saber Expert Plus, he found it a little less secure than the standard Quest 2 strap.
Razer also has a silicone face mask insert that replaces the Quest 2 foam insert (Meta has its own silicone foam insert that comes with the Quest 2's new hardware). First, the Quest 2's regular silicon-coated pads worked fine for me. Also, Razer's insert seems to blur my glasses more. Maybe the ventilation is lacking? I don't know. Still, I prefer the less firm cushioning of my VR headset to support my thick glasses. It seems to block more light and Razer promises to be more antibacterial and sweat resistant.
Now Playing:Watch: Razer's Wild New Gaming Gear CES: Handheld Gaming, 3D...
5:15
The price is also worth considering. The bracelet is $70 and the bezel is also $70. Considering a Quest 2 game costs $400, that's a lot to invest in extras. There's nothing wrong with the included Quest 2 strap, and it's free. But Razer's extra level of comfort may be worth it if you want something different.
What's more interesting to me than the current Razer Quest 2 product is what's next. Razer plans to become a regular meta accessories manufacturer and will continue to work closely with ResMed. Does this mean Quest 3 accessories will arrive in the fall? Could this ultimately mean controllers? Or other VR-ready gaming accessories or peripherals? I want to see what's on the bridge. It's a great start.
Advantages: category leader position; peculiarity of the second row; net travel TrailSport is really fun and incredibly powerful.
Cons: Thirsty V6 with no hybrid or turbo options
The Honda Pilot is all-new for 2023, bringing new specs and safer off-road styling to a class packed with speed. It's big, quiet, comfortable and packed with the best technology ever, a reminder that the Honda badge is synonymous with class leadership. Then there's the new TrailSport model, which combines beefier tires and increased ground clearance with Honda's torque vectoring all-wheel drive system and takes on the battle of outdoor adventures with Nissan Pathfinder Rock Creek. and Ford Explorer Timberline (among others). . .
Investigation
Before the redesign, the Pilot was one of the more practical options in this segment, but it suffered from a surprising lack of hard-hitting options inside, out, and out. In 2023, the change will solve these problems. The new Rider has a more angular jawline and a deliberately sportier look that pairs well with the dark bodywork offered on the installed Elite and TrailSport fairings. Land Rover's vague interior blends well with the interior.
At the same time, it is based on the functionality of its predecessors, and we are not talking about the size of the balloons. For families who can't decide on a seven- or eight-passenger seating configuration, Honda has made the buying process a bit easier by offering a detachable second-row center seat that can also be removed on the fly. You need more storage space in your garage. Quality-of-life improvements like these help propel the driver into the incredibly tight field of three-row crossovers.
Interiors and Technology | Passenger and cargo area | performance and consumption
What is it like to drive | Prices and features | failure rates and safety features
What's new for 2023?
The Whole Thing The 2023 Pilot represents the latest step for Honda engineers, who have put just as much effort into the new Civic, HR-V and CR-V, as well as the updated Accord.
How is the interior of the pilot and the technology on board?
Honda has completely ditched the old window cab for a new, sleeker, more luxurious look. The front seats have been redesigned for better support and less fatigue. Materials, fit and finish show improvements over the previous generation and help make practicality one of the most attractive options in the class if you upgrade the cabin. There is no space under the console, but there is plenty of space in the dash compartment with room for clothing.
The Pilot finally gets the updated infotainment system that appeared on the last-generation Accord (and has since been replaced by the next-generation). While it's not exactly the latest and greatest from Honda, it's much better than what came before it in the Pilot, which means it's very competitive now. Whether you choose the standard 7-inch infotainment system or the upgraded 9-inch infotainment system, the physical button-to-touchscreen control ratio is ideal. The 10.2-inch digital cluster, only offered on the Elite, is easy on the eyes but doesn't offer many extra features.
The center console has USB-A and USB-C sockets for smartphones, as well as a standard 12-volt DC socket. USB-A charging is standard in the second row; Third-row doors become standard equipment on EX-L and above. The single USB-C 3.0A port on the front is nice, but we'd like to see more around the rear case. Wired Android Auto and Apple CarPlay are standard (wireless is standard on EX-L and above). Elite's new Bose system is the first brand audio offered in Pilot history, and the new TrailWatch camera system features four external cameras with four different views.
How tall is the pilot?
The new driver describes the class average well. It's about 5 inches longer than the Toyota Highlander and 5 inches shorter than the Chevy Traverse, about the same as the Nissan Pathfinder. As a result, it skirts a bit more of a minivan interior. This is particularly true of the new second-row seating arrangement on the Touring and Elite trim levels. It's a bench seat, but like the Odyssey and Pilot's Acura MDX cousin, the center seat folds down to form a console-like armrest. It can also be removed from the car entirely or stored in a dedicated compartment in the driver's rear cargo area. Unlike its Pilot competitors, you don't have to choose between an eight-passenger bench seat or a seven-passenger captain's chair, but note that the TrailSport doesn't offer that feature. Between the Rider's updated all-wheel-drive system and full-size spare tire (should it go flat off-road), there's simply no room for the requisite cubbies.
The big Honda has one of the best parts in its class. The 40 inches of second-row legroom exceeds that of almost all competitors. Driver's third-row legroom has grown to a maximum of 32.5 inches, making it more comfortable in the 6-foot-plus category for older kids and adults, too. That puts it behind the Toyota Highlander and Nissan Pathfinder (both offer 28 inches) and the Chevy Traverse (33.5 inches).
The cargo area is 22.4 cubic feet, not including the huge floor, which can be used to carry more luggage (or that middle seat) as before. The latest generation Pilot was able to accommodate much more than the official volume, and we hope the same will be true for the new version.
What is the fuel consumption and driver performance?
The 2023 Pilot's V6 engine may initially appear unchanged from the 2022, but it's actually a new 3.5-liter DOHC (replacing the outgoing SOHC mill). The 285 horsepower and 262 pound-feet are a bit higher, but not as much as you might expect. It comes with a 10-speed automatic gearbox and is paired with a manual gearbox.
Therefore, your power generation options are quite limited. The Pilot is available with standard front-wheel drive or all-wheel drive called i-VTM4. These are arguably the most advanced AWD systems in this category, as 70% of the engine's power can be sent to the rear axle and then 100% to one wheel. It is useful not only with poor absorption of climatic influences, but also when dealing with dry soil. This is complemented by a unique Trail Torque Logic system on TrailSport models and a corresponding "Trail" option on the (also new) Rider Drive Mode Select system.
Standard FWD models are rated at 19 mpg city, 27 mpg highway and 22 mpg combined. Adding AWD brings it down to 19/25/21. The TrailSport model with alloy wheels and bump-clear body is rated at 18 mpg city, 23 highway and 20 combined.
Driver can be equipped to tow in 2WD and AWD configurations. 2WD towing capacity is a reasonable 3500 pounds; The choice of AWD brings the ceiling to 5,000, on par with the segment but just below the Kia Telluride (5,500), Ford Explorer (5,600) and Jeep Grand Cherokee L (6,200).
Three-row crossovers aren't typically known for being a lot of fun to drive, but the driver is keeping up with a minivan with wheels, especially if you opt for AWD. While there may be a bit more noise as tire wear increases, if you're concerned about how your people mover feels, we obviously prefer the TrailSport. The thick rubber tread feels more comfortable than standard all-weather tread, adding an artistic touch to a quiet affair. As a standout of the Mazda CX-9, it's as good as it gets in a FWD-based crossover. The Jeep Grand Cherokee and Ford Explorer can be specified with more powerful engines to accommodate rear-wheel drive dynamics.
On the road, the driver appears structured and comfortable. While we wish we had a hybrid option similar to the Highlander, the Pilot is actually better off without Toyota's massive hybrid system. It's smoother on the highway than the Nissan Pathfinder, Kia Telluride, or Hyundai Palisade and its V6, and its V6, while perhaps underrated by modern powertrain standards, offers plenty of pulling power when needed.
The TrailSport has a unique suspension with 1-inch lift (for an overall ground clearance of 8.3 inches) and improved approach and departure angles. Sway bars, spring rates and shock tuning are exclusive to TrailSport, as are the full-size spare tires and 18-inch wheels (TrailSport stamp) with Continental TerrainContact off-road tires. Skid plates protect the oil pan, transmission, and gas tank, and Honda claims that each can support the full weight of a rider falling onto a rock. The result is a surprisingly capable vehicle for little more than a minivan, though like the Pathfinder Rock Creek or Explorer Timberline, it's not particularly strong off-road. It's the kind of SUV that can get you on the trail but won't let you start your own fire. Those who know they need to do more than the bare minimum are well served with the three-row Jeep Grand Cherokee L, available with a limited-range transmission.
What other Honda Pilot reviews can I read?
First Honda Drivers Guide 2023 | Wide stripes and broad shoulders
The room is getting tougher and he seems to be proving something.
How much does Pilot 2023 cost and what features are available?
Starting at $37,295 (including $1,345 destination cost), the 2023 Pilot LX comes standard with LED headlights and taillights, 18-inch alloy wheels, a 7-inch infotainment screen with Apple CarPlay and Android Auto, as well as automatic air conditioning with three zones. The Sport adds electric regulation in the driver's seat and heating for both passengers. If you want the biggest infotainment system, go for EX-L or better. The Touring gets you a 12-speaker Bose sound system, and the loaded Elite is the only one offered with a HUD.
The TrailSport is an exceptional surface for the rider. This is the only way to get the aforementioned goodies in the field. Nestled between the Touring and Elite models, it conveys a uniquely rugged look and capability with a solid spec package.
Here are the prices for the 2023 Honda Pilot, broken down by configuration:
LX: $37,295
Sports: $40,495
EX-L: $43,295
Ride: $47,795
TrailSport (AWD only): $49,695
Elite (AWD only): $53,375
What are the driver safety standards and driver assistance features?
The 2023 Honda Pilot hasn't yet been rated by the US government or the Insurance Institute for Highway Safety, but we expect it to do well on both counts.
Standard safety equipment includes Forward Collision Warning with Automatic Emergency Braking, Lane Departure Warning, Lane Departure Warning with Lane Departure Warning, Adaptive Cruise Control with Speed Adaptive Distance Sensing, Sign Recognition traffic, driver inattention and automatic high beam. Typically these features include the basic "Honda Sensing" safety package. Slow-speed brake control, cross-traffic control, and a parking sensor system are available on higher trim levels. Importantly, it's vastly improved over similar systems from the previous generation Pilot (adaptive cruise control in particular) and while it's not the most powerful in the segment (check out Kia and Hyundai for that), now are up to date Stand . Average.
similar video
2023 Honda Pilot review: A complex and competitive redesign inside and out first appeared on AutoMK on Wednesday March 22, 2023. Please see our Feed Terms of Use.
The 2023 Honda Pilot Trailsport convinced us both off-road and on the TFL test drive!
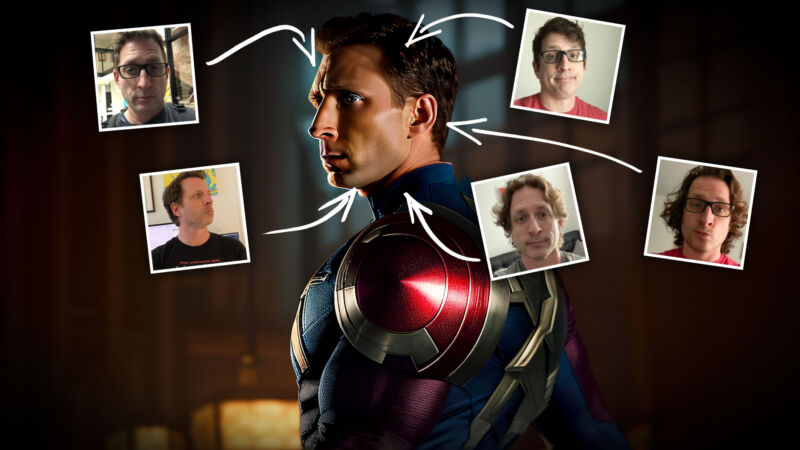
By now you've read a lot about generative AI technologies like Midjourney and Stable Diffusion, which convert text input into images in seconds. If you're anything like me, you'll immediately think of how you could use this technology to punch the Mona Lisa or Captain America in the face. Who doesn't want to be America's butt?
I have a long history of sticking my face in things. This used to be a tedious process of finding or taking a photo with the right angle and expression and then using Photoshop to blend my face into the original. While the result is crazy in my opinion, it's worth it, the process takes a lot of time. But with Stable Diffusion and Dreambooth, I can now train models on my face and then layer them to my heart's content.
In this guide, you'll learn how to install Stable Diffusion on your computer, train DreamBuzz on your face, and create so many selfies that your friends and family will finally stop laughing. The whole process takes about two hours from start to finish, most of which time is spent working on your drawings in Google Collab Notebook.
Before we begin, a few notes.
system details
For this study I am using a Windows PC with Nvidia 3080Ti 12 GB VRAM. You must have an Nvidia graphics card with at least 4GB of video RAM to run Stable Diffusion. The stable distro runs on Linux systems, Macs with M1 or M2 chips and AMD GPUs and can build images using only the CPU. However, the method requires some adjustments, so Windows computers with Nvidia GPUs are selected for the purpose of this study.
Ethical issues
Continue reading
AI imaging technology can now easily create life-threatening fakes.
When it comes to generative imaging software like Stable Diffusion, there are ethical issues that I feel I have to acknowledge. There are legitimate questions about how the data used to train stable diffusion was collected, and whether it is ethical to train programs on artists' work without their consent. This is a large subject that is beyond the scope of this investigation. I personally use Steady Diffusion as an author to help me create quick character sketches and it has become an invaluable part of my process. But I don't think the works created by Stable Diffusion should be marketed until we have at least resolved the ethical dilemma and how exploited artists can be compensated. And for now, I'm of the opinion that the stable distribution should remain for personal use only.
After all, technologies like Stable Diffusion are both exciting and terrifying. It's fun because it gives people like me, who reached the pinnacle of art in kindergarten, the opportunity to create the paintings I dream of. But it's scary because it allows you to create very realistic propaganda and fake jobs that can ruin people's lives. So you need to train Steady Diffusion on photos of yourself or someone you approve. Epoch.
Who wants that now?
Install and use a stable distribution
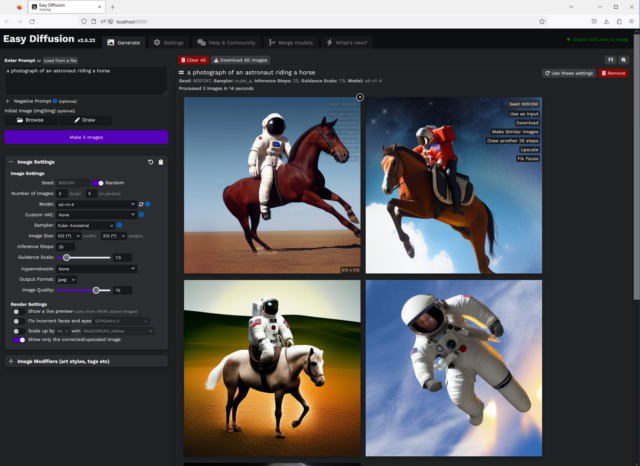
There are several programs that you can use to run Stable Diffusion locally. For this study, I chose Simple Diffusion (formerly Stable Diffusion UI) because it's easy to install and has an automatic update feature, so you'll always have the latest version. There are other installers that offer a different, more customizable experience, like InvokeAI or Automatic1111, but Simple Distribution is user-friendly and easy to install, making it a good place to start.
Go here and click Download. (These instructions can also be found in the following text.)
On the download page, click the Download for Windows link.
You will find a ZIP file named "stable-diffusion-ui-windows".
Right click and extract the file.
You should now have a directory called "stable-diffusion-ui-windows". Go to this folder and find a subfolder called "stable-diffusion-ui". Move this folder to the root level of your hard drive.
Locate the Start Stable Diffusion UI command script file and double-click it.
Agree when it comes up.
A Windows command window will open and the installation process will begin.
To download the installer, go here and click Download which will take you to the download page. Then click the Download for Windows link. This will download a ZIP file named "stable-diffusion-ui-windows".
Right click on the file and extract the files. You should now have a directory called "stable-diffusion-ui-windows". Go to this folder and find a subfolder called "stable-diffusion-ui". Move this folder to the root level of your hard drive.
Ideally you should install it in C. at the root level of the driver. Note, however, that creating images can take up a lot of disk space. So if space is limited, you can install them on a secondary drive as long as it is at the root level.
After moving the directory, go in and locate the command script file called "Start Stable Diffusion UI". double click. A security warning appears stating that the program is from an unknown publisher. Of course, you have to be careful about what you download and install on your computer. I've had a basic transfer for a while with no problems. When you're done, check the box and click Run.
At this point, the Windows command window will open and the installation process will begin. This is a good time to make a sandwich or go to the bathroom as the installation can take 10-30 minutes depending on the speed of your internet connection. The beauty of the ease of distribution and the fact that it takes so little time to install is that it downloads everything you need, including the model you will use to create the image. Simple Distribution comes preinstalled with Statable AI model version 1.4. There are many models available - some official stable AI models and many custom models created by the Stable Diffusion community - and I encourage you to try them out when you get more comfortable with the software. For this step, the 1.4 model is sufficient.
If you decide to browse and download a different model, be aware that there are two types of files: Checkpoint (.ckpt, also called Pickle format) and Shield. Most of the Stable Diffusion community has switched to using secure tools as it is a more secure file format. When making your selection, always choose protective gear over pickups and be sure to scan everything you download.
I hope your sandwiches were tasty, so it's time to move on.
When the installation is complete, you will see "Loaded stable-diffusion model from "C:\stable-diffusion-ui\models\stable-diffusion\sd-v1-4.ckpt to device" as the last line in the command line: cuda: 0" and the browser window to the home page of Easy The Diffusion will open.
When the installation is complete, the last line of the command line window is "Loaded stable diffusion model from "C:\stable-diffusion-ui\models\stable-diffusion\sd-v1-4.ckpt to device. Darling: 0"
A browser window will open with the Simple Spread home page.
Don't close the command prompt window. Just minimize and forget. Opens when you use Steady Diffusion. You don't have to interact with it other than close it when you're done. Now is a good time to mention that you should return to the C:\stable-diffusion-ui folder and not link the Start Stable Diffusion UI.cmd file to your desktop. Every time you want to start the program, you have to go to the directory.
Use the simple distribution
You have installed Stable Diffusion. Well done. So what's the point of all this? Most people want to get to the part where you put your face on something, so I won't spend too much time on the UI, but that's the point.
Simple Zoom / Zoom UI.
The clue is text that turns into an image. For example an oil painting of a cat holding a balloon.
At the negative prompt, enter the things you want to exclude .
Record results for "Balloon oiling with cat".
Here we remove the orange bubbles with negative signs.
Below, in the image settings panel, we have seed . Now leave it to chance.
The number of images (total) is exactly what it looks like. The number of images is the number of images in parallel. So if you want to create five images, you can create five totals in a batch or five totals in five total, which is much faster. What you can create affects the amount of VRAM on your GPU as well as the frame size, which I'll discuss later. I suggest experimenting to find the best combination that works for your system.
The model is the checkpoint file or security backup I discussed earlier. If you have multiple models (which we cover in the Dreambooth tutorial), you can use this drop-down menu to choose which model to use.
Custom UAE . It is a dynamic autoencoder representing United Arab Emirates. In the context of a stable distribution, this helps correct some of the model's errors. A custom UAE included in the basic distribution, vae-ft-mse-840000-ema-pruned, fixes some human eye and manual modeling issues. Different models may have specific UAEs, but I rarely use anything other than what's included.
Example: This is basically a math formula that converts noise into an image, and since I'm just finishing high school algebra I can't go much further. What I do know is that different samples give you different pictures, even from the same breed. The three Euler exponents I use the most are DDIM and DPM++ SDE. Each has its own pros and cons and I recommend deciding which one you like best. I prefer DDIM because it quickly produces consistent results in a few small steps.
The Image Size drop-down menu controls the resulting image size. The larger the image, the more VRAM you need. You might want to stick with 512 x 512 for now. Not only does it overwhelm your GPU, but the robust diffusion models you can use are trained on a dataset consisting of 512x512 pixel images so you get the best results. Stick to these standards.
Initial steps are the number of passes the program makes when attempting to convert the sound to an image. Conventional wisdom often tells us that better is better, but that wasn't always the case here. Eventually going up is a waste of time. This is another area where testing is important. As I mentioned before, I prefer DDM as a sampler because I can usually create a good image in 15-20 steps.
Below that is a directional bar that tells you how much attention your tip should pay to a fixed spread. Lower values give more room for interpretation; Higher prices make it tighter. Again, higher tiers aren't always better. I find that a value between 6 and 9 is best for good leadership.
Hypernetworking is a specific topic that is beyond the scope of this research.
The output format is self-explanatory. The default is JPG because PNG looks better but has nothing to lose and can take up a lot of space.
The display settings are largely self-explanatory. I like to eliminate "correct fake face and eyes" because face correction often results in what people look like with an airbrush.
I also disabled scaling when scaling each image, and the Easy Diffusion UI conveniently adds an upscale button to each image so you can zoom in if you find one you like.
The image modifier is a key to creating tooltips. I won't go into that, but feel free to try. Having said that, I have to say that I don't agree with imitating the style of any living artist. There are many dead artists that can be copied without giving the living artist's name, and many ways to find a unique style.
Dreambooth Training
Now we come to the fun part. It's time to train a model that will allow us to attach our faces to things. There are several possibilities for this. I'm going to introduce you to the Dreambooth method because I find it gives the best results, although it takes a little effort. For this we use Google Collab Notebook.
photo selection
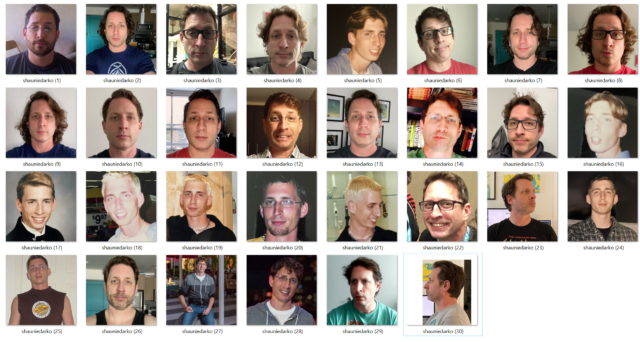
But first we need to choose a photo to use. You can train the model on your face with six to six images, and I've done training that used 100+ images, but I've had the best results with 20-30 images. You want to choose close-up shots that have no one in the frame and a lively background. Ideally, you'll take a few vertical shots, a few side shots, and a few three-quarter shots. Try to avoid taking selfies as the view will distort the size of your face.
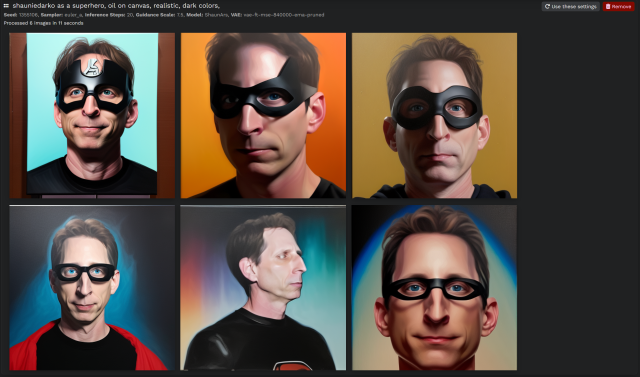
AI Seed / Train with 20 to 30 images of your face.
You should avoid photos of you in the same place or in the same clothes. If you have a clock behind you in an image, Dreambooth will adjust the clock to your face and try to create a stable distribution in every image you create. The same goes for glasses or facial hair. For my training to make the models more dynamic, I chose photos with different hairstyles, faces and ages. You don't have to include the photo below the shoulder, but you can if you want.
Once you've selected your photos, you'll need to crop and resize them so they're all 512 x 512 pixels. Try to use PNG file format to avoid JPG artifacts. If you don't crop it, the program will do it for you and your face may not center properly. Before you do so, think about the word you will use when you want the model to grimace - angry or loud. For example, I use shauniedarko because it's easy to remember, it's my twitter account, and there are no words in the training dataset. If you use any kata in a training set you will not get good results.
So you have your trigger word and photo. Rename each file using the pattern "triggerword (x).png" where x is a number.
Embrace the facial expression
You will also need the Hugging Face spell from the Stable Distribution Models repository. To do this, visit huggingface.co and create an account. Then go to Settings, then Access Token and create a new token. Name it anything you like and change its role to Writing. Copy and paste the token into a plain text file named "token.txt". Then go to this link, accept the terms and conditions and you're good to go.
After creating your Hug Face account, go to Settings.
Go to Access Tokens.
Create a new token and give it whatever name you want. Change the role to "write" and copy and paste the token into a plain text file named "token.txt". Then open this link.
Training
Here is the Google Collab we used.
Play the first episode by pressing the play button.
You will get a popup saying the notebook was written by Github and not Google. Click Continue Running.
You will be asked for your permission to connect your Google Drive. This is the norm. This allows the laptop to store and access important files.
Then click the Play button next to Dependencies. This will install all the necessary files to run the laptop. Once done, you'll see a green tick next to it.
Now we can start training. You need a Google account to do this. Each Google account comes with 15GB of free storage. You need 6 to 8 GB free before you start.
Here is the Google Collab we used. Click this link and let's get started! Make sure you're signed in to Google.
Play the first episode by pressing the play button. You will get a popup saying the notebook was written by Github and not Google. Click Continue Running. You will be asked for your permission to connect your Google Drive. This is the norm. It allows the notebook to store and access important files.
Next, click the "Dependencies" button on the play button. The button installs all files that you can run.
Before you can finish the next part, you need to open your Google Drive. » When finished, click the play button, it will become "Done".
In the section «Стожцел/Бернель сесия»:
Words:
Pre-select the 30 images we uploaded earlier, each of which takes a minute to download.
When your images are uploaded we will animate them: you can leave the captions on.
Education???
Go to "Text_encoder_training_steps" and change it to 1050::
Click the play button and wait: 30 frames will be displayed
The tutorial is complete when you see this screen:
Go to Google Drive - fast-dreamboot > Sessions > unesnam and locate the ckpt file provided earlier.
Move the file to the computer folder C:\stable-diffusion\Models\stabledifusion: Then open Simple Diffusion and start it
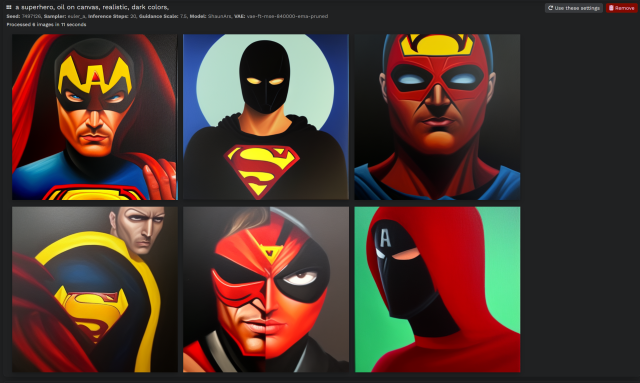
In the section «Стожцел/Бернель сесия»:
Click on the sample images, click the button, button, button, button, button, button, button, button, button, button, button, button, button, button, button, button, button, button, button, button, button, button, button, button, button, button, button, button , by clicking the button, the button, the button, the button, the button, the button, the button. Button, the button, button, button, button, button, button, button, button, button The best way is to know you're still breathing.
When your pictures are uploaded, we move, move, move, move.
And the training does not repeat face, face, face, face, face, steps, steps, steps, it is not enough to reproduce your different styles.
Enter the number of steps after "Text_encoder_training_steps" and change it to 1050: Number of numbers Number of numbers Number of numbers Number Number Number Number Number Number Number Number Number Number Number Number Number Number Number Number Number Number Number Number Number Number Number Number Number Number Number Number Number Number Number Number Number Number Number Number Number Number Number Number Number Number Number Number Number Number Number Number Number Number Number Number Number Number Number Number Number Number Number Number Number Number Number Number Number Number Number Number Number Number Number Number Number Number Number Number Number Number Number Number Number Number Number Number Number Number Number Number Number Number Number Number Number Number Number Number Number Number Number Number Number Number Number Number Number Number Number Number Number Number Number Number Number Number Number Number he number number number number number number number number number number number number number number number number number number number number number number number number number number number number number number number number number number number number number number you can start it.
However, note that each deal is approximately 100%.
After that, click the play button and wait.
30 pics and should last 30-50 minutes depending on how you are feeling. Again, make sure you don't freak out and scroll around google - because of unemployment:
Եվ այն այն ամենն է է է համար համար համար համար սովորելը, սովորելը, թե հուշում հուշում հուշում հուշում հուշում արդյունքները արդյունքները արդյունքները արդյունքները արդյունքները ժամանակ պահանջել պահանջել ՝ ՝ տեսնելու է է է աշխատում աշխատում աշխատում աշխատում աշխատում աշխատում աշխատում աշխատում աշխատում աշխատում աշխատում

 Trying to figure out how to get the most out of a new product can be overwhelming. Luckily, many companies offer product tutorials so you can get the most out of your purchase. In this article, we'll talk about the benefits of product tutorials and how they can help unlock the full potential of your product.
 Depending on the product you are purchasing, different types of product manuals are available. Some of the most common product guides include:
 There are many benefits to using product manuals to teach you how to use your products. Some of the main benefits:
 Product tutorials are available from different sources depending on the product you purchased. Some of the more common sources are:
 Product tutorials are a valuable resource for anyone looking to get the most out of their product. With many guides, you can study at your own pace and on your own schedule. Whether you prefer video tutorials, documentation, or online tutorials, we have a tutorial to help you unlock the full potential of your product. So why not start learning today and take your product experience to the next level?

 Technology is constantly evolving and it can be difficult to keep up with the latest trends and developments. Fortunately, there are plenty of technical tutorials online to help keep you up to date with the latest technology. In this article, we will provide a complete guide to technical tutorials and how they can help you master your technical skills.
 There are many benefits to using technology lessons to improve your skills. Some of the main benefits include:
  There are many places to find technical tutorials online. Some of the best sources include:
  Technical tutorials are a valuable resource for anyone looking to improve their technical skills. With so many online tutorials available, you can study at your own pace and schedule. Whether you prefer educational videos, text-based tutorials, or interactive tutorials, there are tutorials to help you master your tech skills. So why not start your research today and take your technical skills to the next level.


:no_upscale()/cdn.vox-cdn.com/uploads/chorus_asset/file/21882207/Quest_2_with_Elite_Strap___Battery_accessory.jpg)
:quality(70)/arc-anglerfish-arc2-prod-tronc.s3.amazonaws.com/public/7OBFCQUIMKRYNNMKYO445QNSBM.jpg)


:no_upscale()/cdn.vox-cdn.com/uploads/chorus_image/image/70765625/ai_bias_board_1.0.jpg)